Whether you’re wanting to go into web design, make your own personal blog, or simply customize your Tumblr theme (if people do that anymore), knowing how to use HTML can be a very handy skill to have. As easy as it is to learn, there’s no excuse not to know it, if you want to learn. There are countless tutorials online, so I figured, why not make another?
I am making this tutorial because the tutorials I have seen either make HTML seem more difficult than it really is by including unnecessary side notes like CSS and JavaScript, or oversimplifying it to the point that those who read the tutorial do not actually understand HTML. Why not make it simple and thorough? This will be intended for complete beginners so if you know HTML by heart, this is not for you. You may not learn it in ten minutes like other tutorials will promise but I think you can easily read through this within thirty minutes and have a better understanding of HTML.
I will not go over every HTML element (as there are quite a few) but this tutorial will teach you the syntax and the basics so that when you encounter new elements, you will be able to easily learn about them. No more rambling, let’s begin.
Hold up! A Quick Note

You’ll be reading about and possibly writing some HTML and some things may not make sense at first glance. This is normal because HTML is a mess but, as you learn more, the puzzle pieces come together.
Make sure to read every word. You can read quickly and skip over sections that you feel are easy or unimportant but if I mention it, it is probably worth paying attention to. Follow along, write your own HTML code. Doing something is easier than just reading it. Okay, let’s get started.
What is HTML?
HTML is the language we use to create web pages. HTML stands for HyperText Markup Language. Sounds difficult, but it’s far from it. Before you close that tab, let’s break this down word-by-word. Text is what you’re reading right now (shocker, I know). HyperText is just text that includes HyperLinks that reference another page. When you click on that “Which Friends character are you?” quiz on Facebook (I’m Chandler?), that is a HyperLink; we usually just call them links. HyperLinks exist inside of HyperText.
Okay, the next word is Markup. With HTML, we can markup our text so that we know what that text is for. Is it just regular text? Is it a title? Is it a list of things? HTML is a markup language (not a programming language) that allows you to tell the computer what the purpose of the text is. Once the computer knows the purpose of the text, it can customize its appearance to make your text easier to read.
Now, what if I want to make my text look blue and appear in Comic Sans? Well, first of all, don’t. Second of all, that is not what HTML does. HTML doesn’t tell the computer how text should look but rather what the purpose of the text is. We can make text look different through something called CSS. Let’s not get ahead of ourselves though, let's learn HTML first.
HTML is the language of the web. When you visit Ars Technica or XKCD (two websites I spend too much time on) or any other website, it was created with HTML. You access HTML pages with a web browser which retrieves your HTML and immediately turns it into a language that the computer can understand (imagine little ones and zeros). It’s a little more complicated than that but I think that might be out of the scope of this tutorial. To access these HTML documents, most of us probably use Google Chrome but you can use Microsoft’s Edge browser, Apple’s Safari browser, or Mozilla’s Firefox browser.
Getting Started
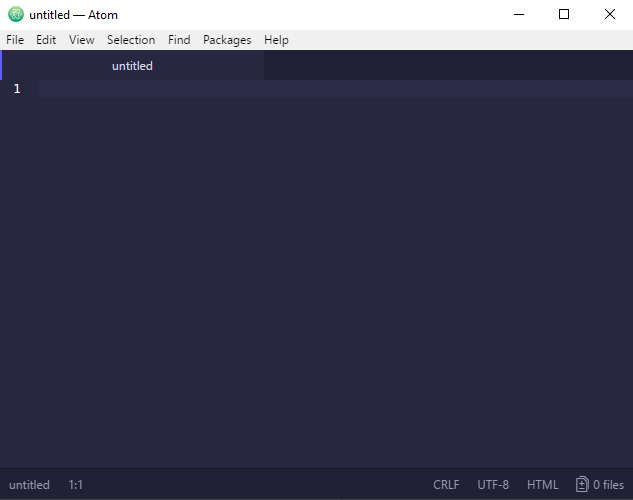
Now we know what HTML stands for and how it is used. How do we make it? First off, we need a text editor. A text editor is different than word processors like Microsoft Word because it is not made to format text for printing. It is made to type text and that’s it. No formatting, page backgrounds, or fancy 3D text. You can use Notepad if you're using Windows or TextEdit on Mac. If you're using Linux for some reason, you probably have gedit. I personally use a text editor made by GitHub called Atom because it's really easy to use, has tons of features, and works on Windows, Mac, and Linux. You can download it here.
Now that we have a text editor, create a new file and save it somewhere on your computer. You can call it whatever you want but make sure that you type “.html” afterwards (or “.htm” because filetypes used to be limited to three characters, but this isn't a history lesson). Remember where you save this file on your computer because you will need to double click on this file to open it in your Internet browser.
Now, in your new text document, type the following:
<!DOCTYPE html>All HTML documents begin with this first line of text. We’ll call this the document type declaration. This basically tells the computer that our document type is HTML and says that we're using the fifth version of HTML. HTML has gone through some revisions since it was invented and each version used a different document declaration. In this tutorial, we’ll focus on HTML5 because you likely won't write HTML in any previous version. Now press the Enter/Return key to move on to line two.
Tags: The Most Important Concept in HTML
Now, HTML uses tags to markup any text we write in our text file. You don't have to know what a tag is yet. So, imagine we type out a few words:
YOLO. Swag. Money.Forgive me. Moving on, let's say we want this to be the title of our text document. We would use a title tag. Most tags in HTML look like this:
<title></title>You can replace “title” with any other tag name, of which we’ll learn about later. These tags are always typed in lowercase (but I will type in uppercase when giving general examples). Each tag has a start and end (most of the time, we’ll get to that later). The starting tag looks like <TAGNAME> and the ending tag looks like </TAGNAME>. You can place text inside of these tag pairs and even other tags (which we'll also learn about later).
Every starting tag starts with a less than sign (“<”) followed by the name of the tag and then a greater than sign (“>”). Every ending tag starts with a less than sign followed by a slash character (“</”), which is followed by the name of the tag and then a greater than sign (“>”) Notice that there is a “/” in the ending tag. We can place the text that we want to be the title in between the two tags.
<title>YOLO. Swag. Money.</title>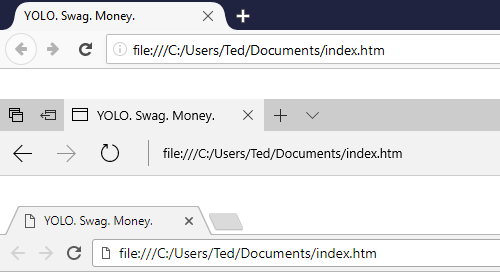
Now “YOLO. Swag. Money.” is the title of our document (sorry). Any text in the title tag becomes the name of the browser tab. Why doesn't our document type declaration (<!DOCTYPE html>) look like our title tag? The document type declaration is actually not a tag but a declaration (or preamble) and, luckily, the only one we have to worry about. Almost every tag follows a similar structure to the title tag. Here is a valid HTML5 example:
<!DOCTYPE html>
<title>YOLO. Swag. Money.</title>
Now what if we wanted to type the less than or greater than symbols in our text? Because HTML tags use the less than and greater than symbols to markup text, we need to represent these two characters as something else in our HTML. We do this using entities. Entities begin with an ampersand (“&”), followed by the name of the entity, then followed by a semicolon (“;”). Let’s say we want to type “1 < 100 & 100 > 1”. We would replace the less than sign with the entity for the less than symbol which looks like this: <. Similarly, the greater than symbol looks like this: >. Because we use the ampersand to tell HTML where to find entities, we will also need an entity for the ampersand. Ampersands can be written in HTML as &. With this in mind, “1 < 100 & 100 > 1” would become the following in HTML if we put it inside our title tag:
<title>1 < 100 & 100 > 1</title>There are actually a lot of entities in HTML of which you can see here. You don’t need to use them all but some can be useful because they are easier to type than the actual character.
The Head and Body
If you typed out that title tag earlier, erase it. We're not ready for it yet. Keep the document declaration though. After the document declaration, we need a new tag. This tag will hold all other tags in our HTML document. In HTML, tags can hold other tags which can hold other tags and so on. Almost any tag that has an opening and closing tag can have a tag placed inside it (not that it always should). This is called nesting. I can see you aiming for that button to close this tab, don't do it.
Our title tag had text inside of it (“YOLO. Swag. Money.”) We could replace this text with another tag to make it nested inside of the title tag. The title tag does not need any tags nested inside of it but other tags that we'll learn about do, like the html tag.
Go ahead and type <html></html> on the next line of your text document. It should now look like this:
<!DOCTYPE html>
<html></html>
The html tag is where we will place all of our HTML (fitting, isn't it?). We will put all other tags inside of this HTML tag. Now, move your cursor to the inside of the html tag (in between <html> and </html>). This is where you’ll place your next tag. There are two tags that go inside the html tag. These are the head and body tags. The head tag is where we’ll place information that’s intended for the web browser, like what the tab should be called (using our title tag from earlier. I’ll explain in a minute), or what icon should be displayed alongside the title. The body tag is where we place text and other tags that will show up on the page when we view it in the web browser. We should use both tags when working with HTML. Let’s go ahead and type the head tag inside of our html tag.
<html><head></head></html>This is a little hard to read. What if we put another tag inside the head tag and another tag inside that one? HTML would become a pain to read. To fix this, we position our cursor inside of the html tag and press Enter/Return then press Tab on our keyboard. Then we type the head tag and press Enter/Return again, like so:
<html>
	<head></head>
</html>
Now, that’s easier to read. We know that the head tag is inside of the html tag because it is farther from the left and is on its own line. We don’t have to organize our HTML this way but it does make it much easier for us to read. In fact, you can press the Enter/Return or Tab key as many times as you’d like in your HTML and it will still look exactly the same in your web browser.
We could say that the head tag is a child of the html tag and that the html tag is the parent to the head tag because the head tag is inside of the html tag. Tabs and returns make it easier to see this relationship because the head tag is pushed farther from the left.
Now, we we want to add the body tag (because we should use both head and body tags in HTML). The head and body tag both should be children of the html element. So, we will add the body tag below the head tag. Since the body tag is a child of the html tag (just like the head tag), we will put a tab before we type the tag. Our file should now look like this:
<!DOCTYPE html>
<html>
	<head></head>
	<body></body>
</html>
You do not have to know what the body tag is for yet. We will come back to it. Technically, we do not need the html, head, or body tag in HTML5 but we should always use them to organize our HTML document because they will become a lot more helpful when we write a lot of HTML.
Now, what do we call it?
Earlier, we typed a title tag and placed a cool phrase inside of it. The title tag is placed inside of the head tag. The title tag is used to tell the browser what our HTML document should be called. The browser then uses this information to rename the tab to whatever you put inside of the title tag.
Inside of the head tag, type out the title tag and put some text inside of the tag. Remember to add two tabs before it because the title tag is a child of the head tag and a child of the html tag. Tabs may be a nuisance now but they’ll make things easier, later on.
<!DOCTYPE html>
<html>
	<head>
		<title>How am I Chandler?</title>
	</head>
	<body></body>
</html>
Go ahead and save this. Now find where you saved this file and double click it. It should open up in your Internet browser.
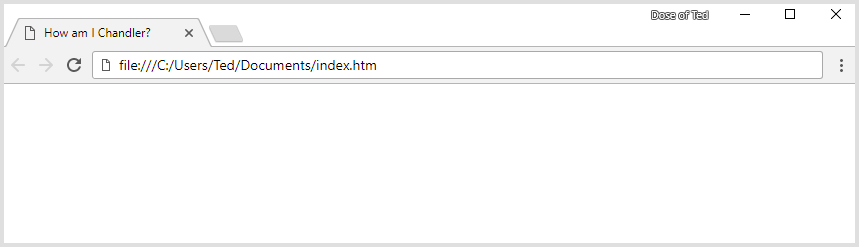
Your page should open up in a new browser tab and the title should now be whatever text you put inside of the title tag. You’ll see nothing but a white page in your browser window. This is because there is nothing inside of our body tag yet.
We’ll get to that, I promise! First, I want to talk about a tag called the metadata tag. Metadata is data that describes data. Don’t fall asleep yet. Metadata tags can actually be used to give search engines and social networks information about your HTML document, if you upload your HTML document to a website.
Meta this, meta that (Metadata)
So, what is a metadata tag? It basically is a way to give the web browser and other websites information about your HTML document. We use HTML to make websites, so imagine that you upload your HTML document to a website (which I’ll tell you how to do later). If you share a link to your website to a friend on Facebook, Facebook will show a summary of that link.
Where did Facebook get the name, description, and picture for our website? It retrieved this information through metadata tags on our HTML document. Metadata tags will give Facebook the data that it needs to create a summary of our website when we share it. So how do we make them? This tag will look a little different from the tags we have typed so far.
The reason I talk about the metadata tag is because this tag introduces us to two important concepts in HTML: void tags and attributes, which are used in many other HTML tags. metadata tags are unique because unlike every other tag we have typed, it does not have an ending tag. Metadata tags are called void tags because they do not contain any text inside of them and cannot have any tags put inside of them. We can remember this because the metadata tag does not have an ending tag. We would type it like so:
<meta>This metadata tag does nothing. In order for it to do anything, we have to add something called attributes. Attributes give more information about the tag. Now that we know this is a metadata tag, what type of data are we describing? What if we want to give a short description that tells search engines and social networking websites what our HTML document is about? We do this by using the name and content attributes.
Attributes are typed after the name of the starting tag, right before the right angle bracket. Attributes are always placed in the starting tag, never in the ending tag. To create an attribute, you would type the name of the attribute, followed by an equals sign and then two quotation marks. Whatever you want that attribute to be would be typed in between the quotation marks.
<TAGNAME NAMEOFATTRIBUTE="The value of the attribute">Tags can have multiple attributes, just separate them with a space, like so:
<TAGNAME ATTRIBUTE="Some value" OTHERATTRIBUTE="Some other value">As I said earlier, the metadata tag has two attributes: “name” and “content”. The name attribute will tell us what data we are describing and the content attribute will describe that data. Let’s start out by writing a metadata tag in our head element, right below the title tag.
<meta name="description" content="An expression of criticism for online quizzes">Our HTML document should now look something like this:
<!DOCTYPE html>
<html>
<head>
<title>How am I Chandler?</title>
<meta name="description" content="An expression of criticism for personality quizzes">
</head>
<body></body>
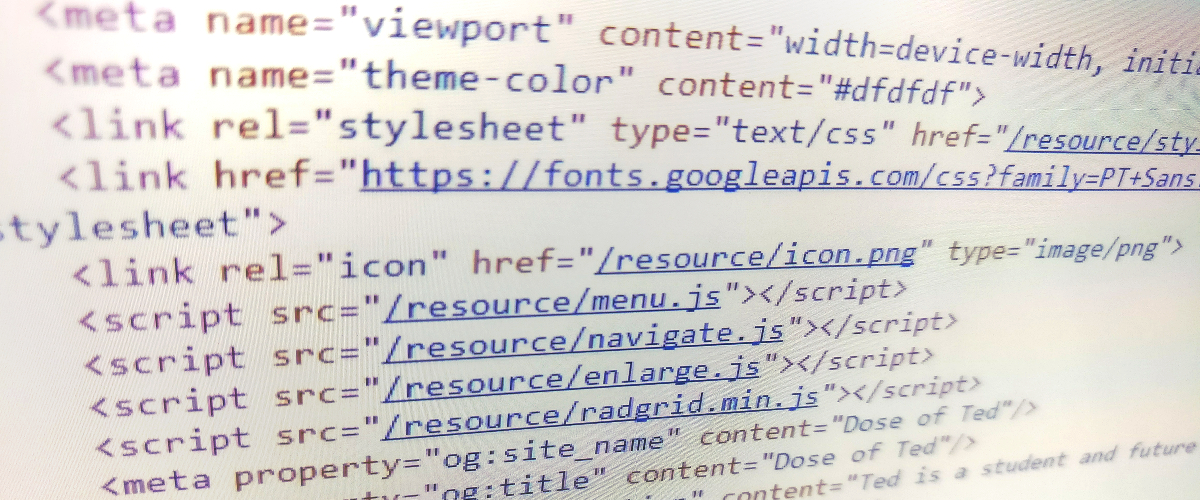
</html>This metadata tag will give us a short description that could be used on Google search results or to help Facebook or Twitter describe our website if someone was to share it (assuming you published this to the Internet). Metadata tags always belong inside the head tag because they are made for the browser and are not intended for those viewing the page. You won’t ever see metadata tags on your page in a web browser but it can help the browser and other websites understand your webpage better. They are not required in HTML5 but can be very useful, especially when sharing a website with a friend. A few common examples are shown below. You do not need to know what these mean. Just know that metadata tags are very useful and can be used for a variety of reasons even though the person viewing your HTML page may never see them.
<meta charset="utf-8"/>
<meta name="author" content="Dose of Ted">
<meta name="theme-color" content="#dfdfdf">
<meta name="viewport" content="width=device-width, initial-scale=1">
Onto the Body
There’s still other HTML tags that go inside the head tag but those are not useful to us right now. They are more useful when you learn about CSS and JavaScript (which I may write tutorials about later). Let’s move onto the body tag that we typed earlier. This is where we will place our content that people will actually see on the page when our HTML document is opened in a web browser. In between the body tags, you can simply write whatever text you want, and that will be valid HTML.
<body>My name is Ted.</body>However, we may want to format our text so that the computer knows how to display it. Let’s say we want our text to be a part of a paragraph. How would we format the text? We would put our text inside of a paragraph tag. The paragraph tag looks like this:
<p>My name is Ted.</p>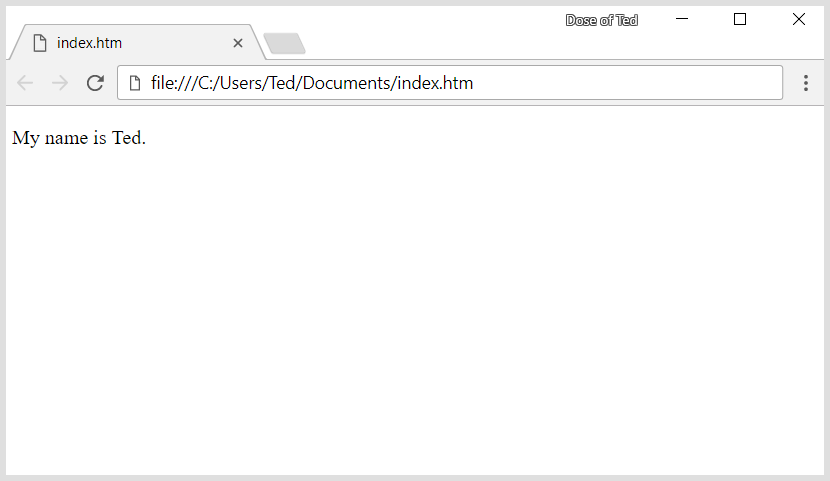
We simply put our text in-between the starting and closing paragraph tags. We use the letter “p” because it is easier to type out than <paragraph></paragraph>. The paragraph tag belongs inside of the body tag. We wouldn’t type the paragraph tag inside of the head tag because this is where we tell the browser and other websites information about our HTML document. It’s only text that we put inside of the body tag that is intended for other people to see. Here is a full example:
<!DOCTYPE html>
<html>
	<body>
		<p>My name is Ted.</p>
	</body>
</html>
Now, what if we want to put the title of our page inside of our page? Could we just put the title tag inside of the body tag?
Nope. There is actually another tag called the header tag that we can use to show that text is supposed to be a header on the page (not to be confused with the head tag). The title tag is only used in the head tag and is meant to tell the browser what the title of our page is. If we want to create a header that people will actually see when they open our HTML document, we would type a header tag and put text in-between the opening and closing tags.
<h1>This is a Header</h1>The “h” in this tag stands for header. Why did we type the number 1 beside it? This is because we can have multiple headings on a page. The number beside the “h” tells us how important the header is. H1 is the most important heading. If we typed an h2 tag, it would be less important than h1 (probably a subheading). We can have h1 through h6 headers in HTML. Below is a partial example, inside of the body tag:
<body>
	<h1>Friends Characters</h1>
	<p>In Friends, we have the friends and then we have the friends of the friends.</p>
	<h2>Main Characters</h2>
	<p>The main characters include Monica, Ross, Chandler, Joey, and Rachel.</p>
	<h2>Side Characters</h2>
	<p>Some common side characters include Ugly Naked Guy, Carol, and Richard.</p>
</body>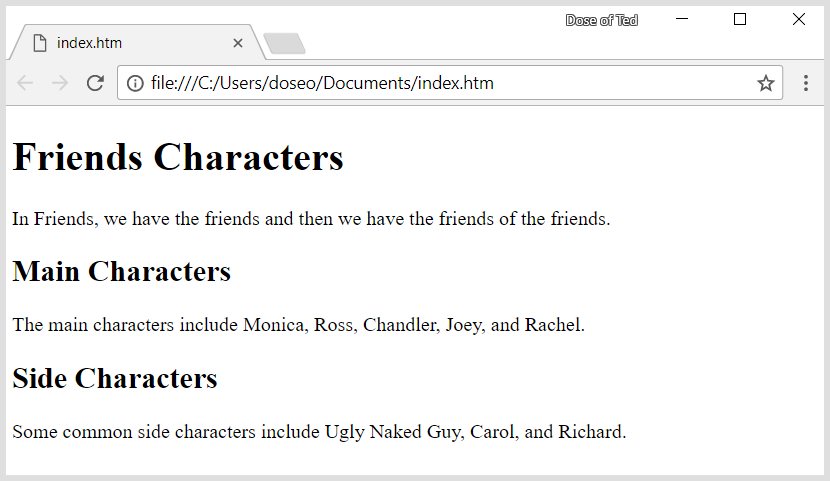
You can have multiple headings of the same importance in your HTML (so you can have more than one h1 tag if you’d like). If you open your HTML document in a web browser, you’ll notice that header tags get smaller as you go from h1 to h6 tags. Remember that HTML is used to tell the computer the purpose of text, not to make the text look bigger or smaller. You should not use HTML to make text look different. We can customize the look of our HTML document with something called CSS, which is out of the scope of this tutorial. We will need to know HTML first.
Now, we know how to place paragraphs and headings into our HTML. There’s still a lot that we can do to our text. What if we want to make a list of things? We have specific HTML tags that can do that. However, before we go over how to make lists, I want to go over something else really quickly, which is how to format specific words or phrases in our text.
Formatting Specific Words and Phrases
What if we want our text to be bold or italic? We can do this with the strong tag and emphasis tag. The strong tag is meant to show that a word or phrase is important. We type it like this: <strong></strong>. We can place important text in-between the starting and ending strong tags to make it bold. We can also put emphasis on a piece of text by using the emphasis tag. It is typed like this: <em></em>. Emphasized text goes in-between the starting and ending emphasis tag and will make text italic. Below is an example of both (and an added fun fact):
<p><strong>Semantic satiation</strong> is when a word loses its meaning <em>temporarily</em>, usually after it is said repeatedly.</p>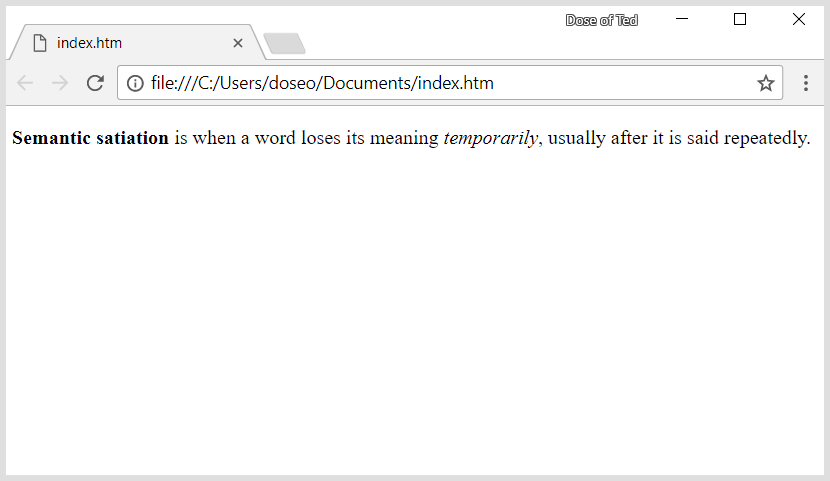
It is important to note that these tags are not made to make text look bold or slanted (even though that is what they do). They are intended to be semantic, and are used to help us better understand the text. As you can see in the example above, the strong tag and emphasis tag can be placed inside of the paragraph tag. They can also be placed inside the header tag and anywhere else that we want text to be marked as important or have added emphasis placed upon it. They can be used in lists as well, which we will learn about next.
Creating Lists of Things
To create a list, we can use the unordered list tag. This will be used to create a list with bullet points. It looks like this:
<ul></ul>Inside the unordered list tag, we put whatever we want to be a part of the list. There is actually a list item tag that looks like this: <li></li>. Each list item tag will represent each item in our list. The list item tag is created specifically to be put inside of the list tag. Below, we create three list items inside of our unordered list:
<ul>
	<li></li>
	<li></li>
	<li></li>
</ul>
With HTML, we can nest tags inside of each other. Inside the list item tag, we could put a paragraph, a header, and a lot of other HTML tags inside of the list item tag, if we want. We could also just put some text inside the list item tags like this:
<li>This is a list item</li>All list items inside of the unordered list will have a bullet point beside it. Here is an example featuring my favorite shows:
<ul>
	<li>Friends</li>
	<li>Parks and Recreation</li>
	<li>How I Met Your Mother</li>
</ul>
Now, what if we wanted a numbered list? We could just type out the number of each list item beside each list item but that would become tedious if we had a lot of list items. Instead, we use something called an ordered list tag that looks like this: <ol></ol>. Any list item inside of this tag will have a number beside of it. We can go ahead and replace our unordered list tag with an ordered list tag. Here is a full HTML example with an ordered list:
<!DOCTYPE html>
<html>
	<body>
		<ol>
			<li>How I Met Your Mother</li>
			<li>Friends</li>
			<li>Parks and Recreation</li>
		</ol>
	</body>
</html>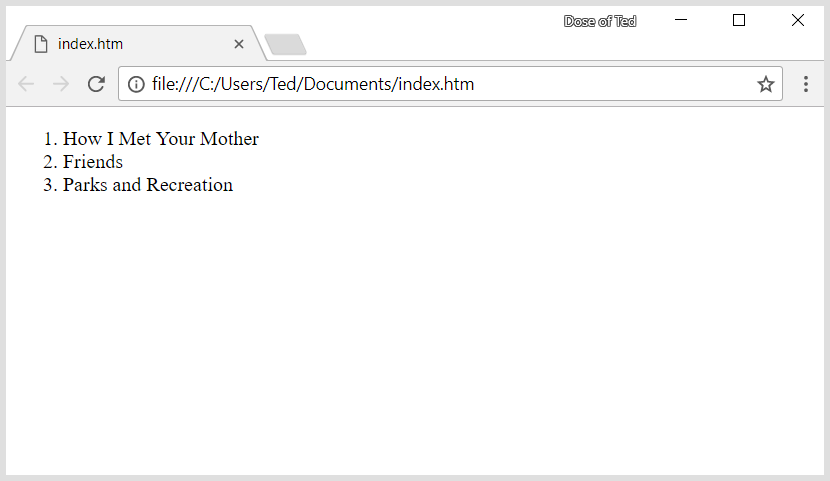
Now, these shows are ranked by which ones I love the most. Now, what if we want to organize our text in a more complex way? Let’s talk about tables and how to make them.
Creating Tables
We use tables to organize data in an easily readable form and HTML has an element to help us create them. The table tag will hold a table. We create one like so:
<table></table>We now have an empty table. To fill up our table, we first new to create a row. To do this, we use the table row tag. It will look like this:
<tr></tr>The table row tag is made specifically to go inside of the table tag. We can put as many table row tags as we want inside of the table tag. Here is a table with two rows.
<table>
	<tr></tr>
	<tr></tr>
</table>
Now, you might be wondering, how do we add columns to our table? Is there a table column tag? Nope. Instead, our table will, by default, have one single column. In order to create columns, we first have to add data to our table.
We do this by using the table data tag. Each table data tag goes inside of a table row tag. Each table data tag, by default, will take up one column, so if we have three table data tags inside of a table row, then our table will have three columns.
<table>
	<tr>
		<td></td>
		<td></td>
		<td></td>
	</tr>
	<tr>
		<td></td>
		<td></td>
		<td></td>
	</tr>
</table>
We can add whatever we want inside of our table data tags. We could put paragraph tags, headers, lists, or about any other HTML tag inside if we want. For our example, we’ll just place some text inside.
<table>
	<tr>
		<td>Name:</td>
		<td>Favorite Food:</td>
		<td>Eyes:</td>
	</tr>
	<tr>
		<td>Ted</td>
		<td>Salad</td>
		<td>Hazel</td>
	</tr>
</table>
Now, tables usually have headers that describe what each column or row means in our table. To do this, we can use the table header tag in place of the table data tag, to make our table data a table header. Let’s take the example above and replace all of the table data tags in the first table row with table header tags.
<table>
	<tr>
		<th>Name:</th>
		<th>Favorite Food:</th>
		<th>Eyes:</th>
	</tr>
	<tr>
		<td>Ted</td>
		<td>Salad</td>
		<td>Hazel</td>
	</tr>
</table>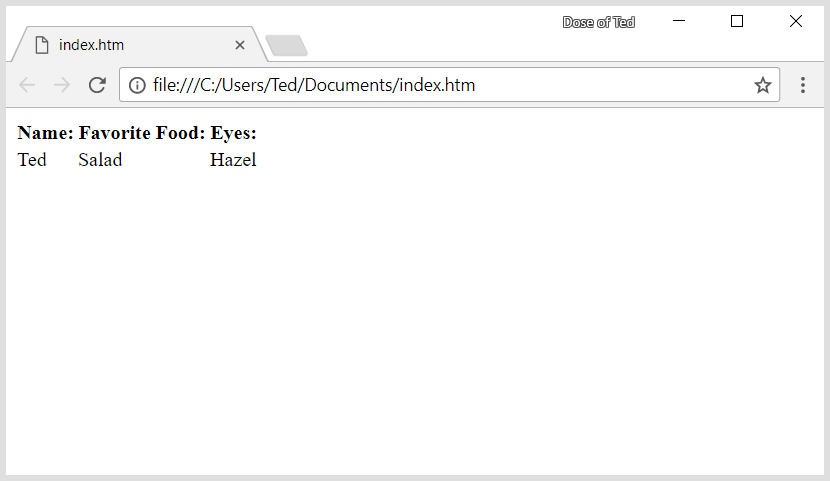
You can see here that we replaced each table data tag with a table header because it represents what data is in each column. Now, you might notice that it is a little hard to look at our table because there are no borders. Unfortunately, in order to show you how to add borders to your table I would have to show you how to use CSS. We will not be going over CSS in this tutorial but trust me that there is a way to add borders to the table. It might also be hard to understand the table because we do not know the purpose of the table.
When we create a table of data, we should probably describe that data so we know what the table is for. We can use the caption tag inside of the table tag to describe our data. The caption tag is always placed inside of the table tag, before we place any other tags like so:
<table>
	<caption>Title of table</caption>
</table>
We would give our table a title in-between the starting and ending caption tags. Once we create the caption then we would define our table rows using table row tags (below the caption), then inside those table row tags, we would place table data tags, each of which will take up one column.
If we want one of our table data tags to take up more than one column or more than row, we can do that using attributes (which we learned about earlier). These are called the column span attribute (colspan="1" by default) and row span attribute (rowspan="1" by default). We will not go over these in this tutorial, but you can learn more about it on the Mozilla Developer Network, or MDN here. Here is an example of a table in an HTML page:
<!DOCTYPE html>
<html>
	<body>
		<table>
			<caption>Random data</caption>
			<tr>
				<th>Name:</th>
				<th>Favorite Food:</th>
				<th>Eyes:</th>
			</tr>
			<tr>
				<td>Ted</td>
				<td>Salad</td>
				<td>Hazel</td>
			</tr>
		</table>
	</body>
</html>
Inserting Links
Just a second ago I linked you to the MDN website. What if we want to add our own links to our HTML document? We can do that by using the anchor tag. The anchor tag is represented by the letter “a”.
<a></a>In-between the starting and ending tags, we can name our hyperlink whatever we like. Let’s say we want to link to our GitHub account, we could call it “My GitHub.”
<a>My GitHub</a>Now, how do we add the HyperLink to our anchor tag? We need to use a new attribute that we call the HyperText reference attribute. The value of this attribute will be the link to our webpage, in this case, my GitHub.
<a href="https://github.com/doseofted">My GitHub</a>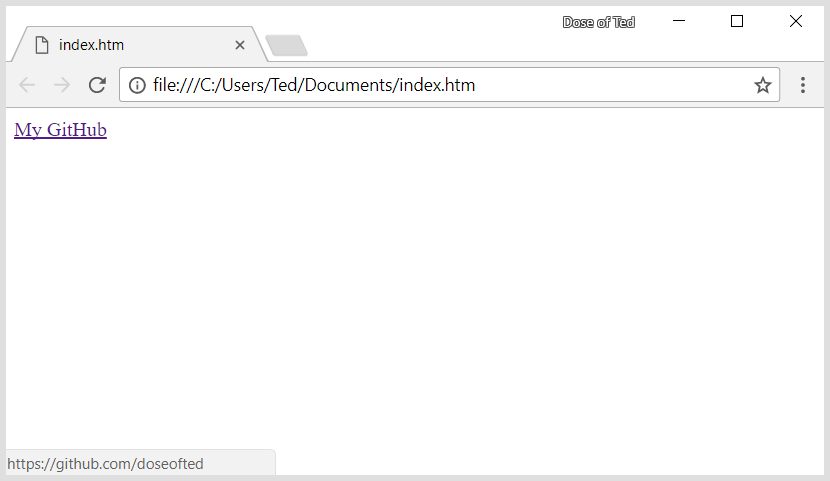
Now, when we click this link, we will be directed to my GitHub account. This is called an external link because we are accessing another website that is not our own. We don't have to link to just web pages on the internet though. You can link to files locally on your own computer, if you want.
Let’s say that we want to link to another HTML document in the same folder as our current document. We can pretend that the name of our HTML document is “index.htm”. What if we want to link to “some-other-html-document.htm” which is in the same folder as “index.htm”? Our folder structure would look something like this:
- Root Folder
- index.htm
- some-other-html-document.htm
All we would have to do is type the name of the file in the HyperText reference attribute:
<a href="some-other-html-document.htm">HTML Document in Same Folder</a>This is called a relative link because we are linking to a file, relative to where our HTML document is located. They are both in the same folder.
Let’s say we have another file inside a folder called “some-folder”. That folder is located in the same spot that our HTML document (named “index.htm”) is located. Our folder structure would look like this:
- Root Folder
- index.htm
- some-folder
- some-other-html-document.htm
If we want to link to a file in a subfolder, we can type the name of the folder, then a slash character, then the name of our folder.
<a href="folder-name/some-other-html-document.htm">HTML Document in Sub Folder</a>You might notice that there are no spaces in our folder or file names. This is because we don’t use spaces in web addresses. You can use spaces in web addresses by typing %20 in the place of the spaces (so “Vitamin C” would become “Vitamin%20C”). This is known as percent-encoding. While you can do this, it makes web addresses harder to type, so you should replace spaces in your file and folder names with dashes or underscores.
What if we have an HTML document that is not in the same folder but is located somewhere else on our computer? We can use an absolute link to link to this file. Absolute links begin with a slash character. The slash character represents the root of your hard drive (or your public folder if uploaded to a server, explained later). It is the top-most folder that contains all other folders. Below is an example on my own computer with a file called “some-html-document.htm” located in the folder “newly-created-folder” which is somewhere random on my computer.
- Hard Drive Root (C Drive)
-
- Users
-
- Ted
-
- Documents
-
- index.htm
- newly-created-folder
-
- some-html-document.htm
<a href="/Users/Ted/newly-created-folder/some-html-document.htm">HTML Document on My Computer</a>We don’t even have to link to another file. We can link to our own HTML document. Let’s say that we have made a huge page of HTML where there is a lot of content to scroll through. Nobody wants to scroll through all of that. What if there is a section of the page that you want to find immediately? We can link to a specific section in our HTML document by linking to an identifier, which is our next topic.
Identifiers
We’ve talked about a few attributes that can be added to our HTML tags to make them clickable (anchor tags) or to give them additional information (metadata tags). There are a few attributes that we can use that are global, meaning they can be used on any element. There are two that I want to talk about: the identifier and class attributes.
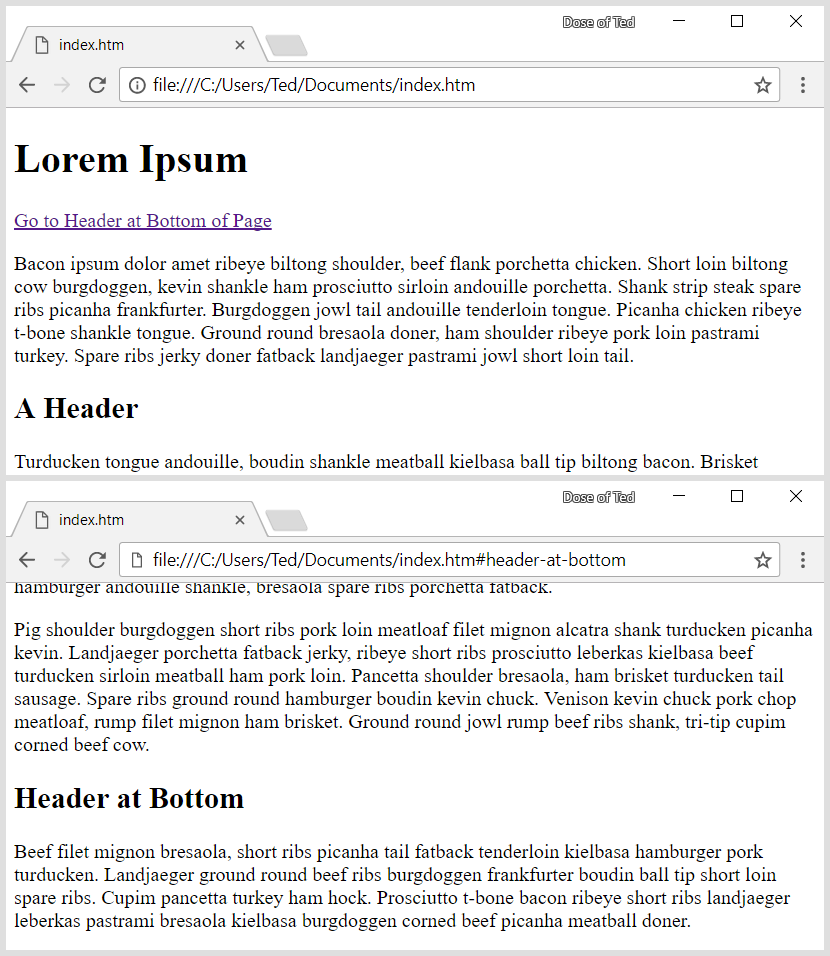
The identifier attribute is used to ID our tags with specific, unique names. Let’s say we have a huge HTML document and we want want to find something specific on the page. How are we supposed to find it? We could scroll until we find it but that could take forever. If we use an identifier, we can link to it and then when clicked, a link could direct us to what we’re looking for. We can add an ID to our header and call it whatever we want like this:
<h1 id="what-is-html">What is HTML?</h1>The name of the attribute is “id” and its value is whatever we want the ID to be. There are a few limits to the name of our ID. It should be alphanumeric and no spaces are allowed. We can also use dashes and underscores if we want. This header now has an ID of “what-is-html”. If we want to link to this header, we can do so using anchor tags. Our HyperText reference attribute that we talked about earlier is going to have a value of our identifier, prefixed with a hash symbol, like so:
<a href="#what-is-html">Navigate to "What is HTML?"</a>The hash symbol lets us know that we are linking to an element on the page. When we click on the link, the page will scroll to the point where our header is located. If we have a very short page where we can see the header, the page will stay the same because the header is already in view. Otherwise, it will scroll to the header. Either way, a hash symbol followed by the name of the ID will be appended to the web address in the URL bar, so that element will be the focus of the page when using that link. Here is a full example (using the Bacon Ipsum generator to generate some random words):
<!DOCTYPE html>
<html>
	<body>
		<a href="#what-is-html">Navigate to "What is HTML?"</a>
		<p>Bacon ipsum dolor amet ribeye biltong shoulder, beef flank porchetta chicken. Short loin biltong cow burgdoggen, kevin shankle ham prosciutto sirloin andouille porchetta. Shank strip steak spare ribs picanha frankfurter. Burgdoggen jowl tail andouille tenderloin tongue. Picanha chicken ribeye t-bone shankle tongue. Ground round bresaola doner, ham shoulder ribeye pork loin pastrami turkey. Spare ribs jerky doner fatback landjaeger pastrami jowl short loin tail.</p>
		<h1 id="what-is-html">What is HTML?</h1>
		<p>Andouille rump bacon prosciutto filet mignon chicken pancetta hamburger fatback doner. Tenderloin fatback swine kielbasa pork drumstick frankfurter burgdoggen landjaeger pig meatloaf turducken flank jerky t-bone. Capicola leberkas frankfurter t-bone, picanha meatloaf doner. Cupim tongue kielbasa turkey, ground round bacon pancetta. Frankfurter turkey venison jowl, beef ribs pork loin prosciutto shank corned beef cupim ground round sausage. Bacon andouille pancetta leberkas.</p>
	</body>
</html>
When adding a link to our page, we can also link to photos, videos, and audio if we would like. However, there are better ways of showing this media in our HTML. Let’s learn how to add an image to our document.
Adding Images
We are finally ready to add images to our HTML document. HTML is not just limited to text. We can add images, video, and audio to our document. Let’s start with images. In order to add an image to our page, we use … you guessed it, the image tag. Like metadata tags that we talked about earlier, this tag will be a void tag. We will not be able to place any text or other tags inside it (and why would you if it’s an image?). It looks like this …
<img>This tag does nothing by itself. We have to add an attribute that will tell the web browser where the image is located. We do this with the source attribute. The value of the attribute will be a link that points to our image. Just like we linked to other HTML pages when we talked about anchor tags, we will do the same with images. We can use external links (if located on another website), relative links (if image is located in the same folder), or absolute links (if somewhere else on your computer). If you do not know what these links are, feel free to jump back up to Inserting Links. The source attribute is abbreviated to “src”. Below is an example.
<img src="cutest-cat-ever.jpg">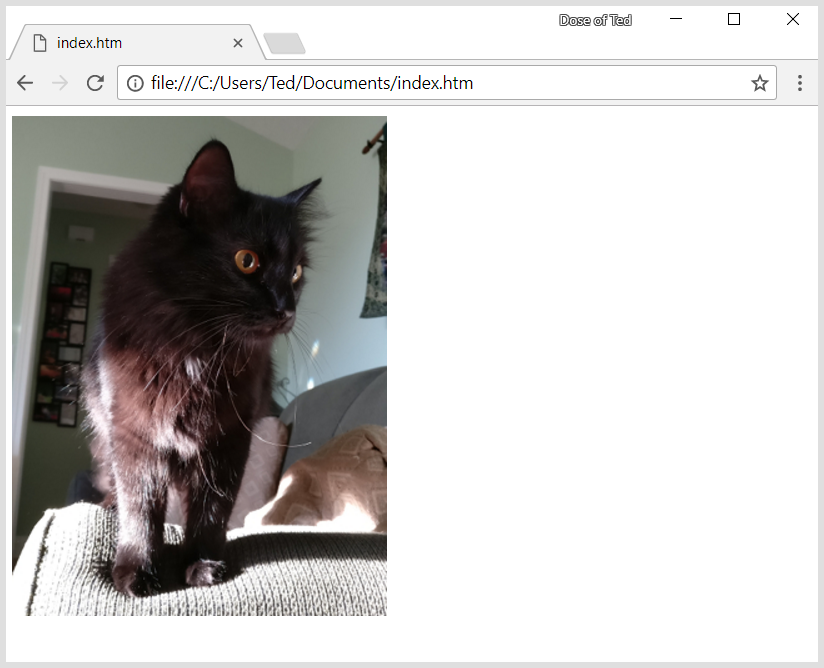
When adding a source for your image, it is important to add the filetype to the image. Is your image a JPEG, a PNG, a GIF (please don’t use GIFs)? You will need to add the filetype to your image in order for the web browser to find it. You can see that my image in the example above is a JPEG because it is suffixed “.jpg”.
Now that we’ve added an image to our page, we need to have something to display in case the image fails to load. Why would it fail to load? You may have mistyped the name of file or, if located on another website, that image may get taken down. Most importantly, those who use screen readers to read webpages need this to better understand what the picture is. We use the alternative attribute to specify text to display when the image fails to load. We use it like so:
<img src="cutest-cat-everrrr.jpg" alt="The cutest cat in the world">Now, we know what this picture is, whether or not it loads. Let’s say we want to add a moving image to our page. No, I’m not talking about GIFs (let’s please try to avoid GIFs). I mean video.
Adding Videos
We can add video and audio to our HTML document by using the video and audio tags. To add a video to our page we’ll start out by writing the video tag, which looks like this:
<video></video>Now, to add a video to our HTML page, we first need a video. We can use a video on another website or one on our computer. The video needs to be in a specific format. Since there are quite a few web browsers, we need to make sure that our video will play in most web browsers on most computers. To do this, we should ensure that our video is in MP4 format because most videos will be in MP4 format. There are other formats that will work like WebM and OGG, but MP4 will be most widely supported at the time of writing.
Similar to our image tag, we can add a source attribute that points to wherever our video is located. We would do so like this:
<video src="name-of-video.mp4"></video>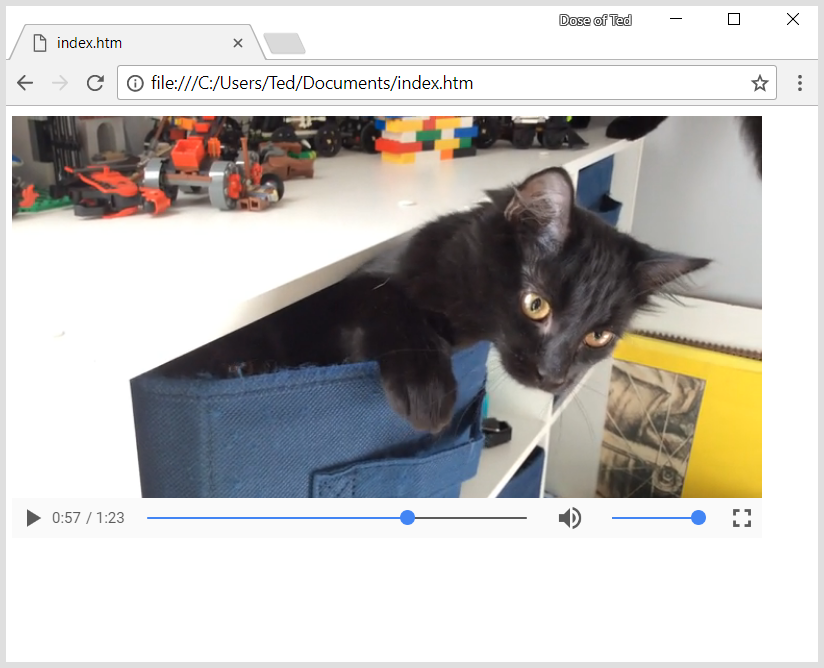
Again, this video can be located on our computer or on another website. We can also have multiple sources for a video. Why would we want to have multiple sources for a video? Let’s say we have a video in WebM format but it is not supported by whatever web browser someone is using. We could add a second source to use in case someone using that browser, can’t see the video.
In that case, we could use a source tag instead. We would remove the source attribute from the video tag and instead use the source tag. The source tag is a void tag (nothing can go inside, start tag only). We would write it inside of the video tag, like this:
<video>
	<source>
<video>
You can see that the source tag is a child of the video tag. In order to add a video to our source tag, we will have to add a source attribute to our source tag (not to the video tag). This may sound confusing, but unfortunately that is just how it works in HTML. We would do this like so:
<video>
	<source src="name-of-video.webm">
</video>
The above example uses a video in the file format “WebM” which is not widely supported at the time. We can add a second source to our video tag for the browser to fall back on.
<video>
	<source src="name-of-video.webm">
	<source src="name-of-video.mp4">
</video>
You can use the source tags if you’d like or, if you only have one video in one filetype, you can just use the source attribute on the video tag. Using the source tag is just another option.
Anyway, now that we have the video in our HTML, where are the controls? We can add controls to our video by using the controls attribute on the video tag (not the source tags, if you choose to use them). The value of the controls attribute is "controls" so you do not need to type the equal sign or quotation marks after the attribute. You can just give the name. Here’s what I mean:
<video src="name-of-video.mp4" controls="controls"></video>
<video src="name-of-video.mp4" controls></video>
You can use either video tag in the example above and they will do the exact same thing. The presence of the controls attribute on the video tag will add controls to the video. The same applies to another attribute of the video tag called the autoplay attribute. The presence of the autoplay attribute on a video tag will make the video play as soon as you open your HTML document in a web browser. Another cool attribute you can use is the loop attribute on the video tag which will, you guessed it, make your video play over and over and over again. Below is an example that will play the video as soon as it loads, and then play it over and over again, with controls shown:
<video src="name-of-video.mp4" controls autoplay loop></video>What about YouTube Videos? (Inline Frames)

Most of the time, we will not be using videos on our own computer. Most of the time, we will upload our videos to YouTube and play the YouTube video on our website. So, could we use the video tag on a YouTube video? No, we cannot. Instead, we can embed a YouTube video using an inline frame tag.
The inline frame tag will allow you to embed other webpages into your own HTML document. There is usually not a need for the inline frame tag but it is helpful when putting content from other websites on your own (like YouTube videos). This is usually unnecessary and outside of using the tag for YouTube, you should probably avoid it. I'm going to show you how to use it anyway. The inline frame tag looks like this:
<iframe></iframe>This inline frame does nothing by itself. In order to embed a webpage, we use the same source attribute that we used for our video. The value of the source attribute when used with the inline frame can be any web address. Unlike the video tag, we cannot use source tags (as there would be no need for it). A complete inline frame would look like this:
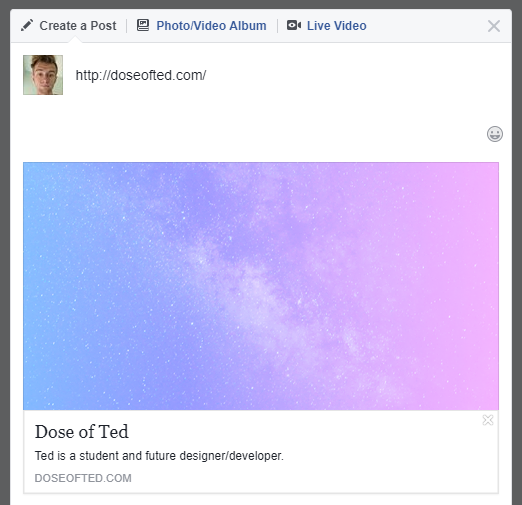
<iframe src="http://doseofted.com"></iframe>If we want to add a YouTube video to our page, YouTube actually provides us the HTML to add the video to our page. Let's say I run a personal blog and want to share this awesome Dance Gavin Dance song. I could go to the video for it on YouTube, tap on “Share” and then on “Embed”. You can copy and paste this HTML into your own and it will display on your HTML document. You'll notice that YouTube added a few extra attributes, of which should be self-explanatory. Here is an example:
<iframe width="560" height="315" src="https://www.youtube.com/embed/vOS6Mk0JpQU" frameborder="0" allowfullscreen></iframe>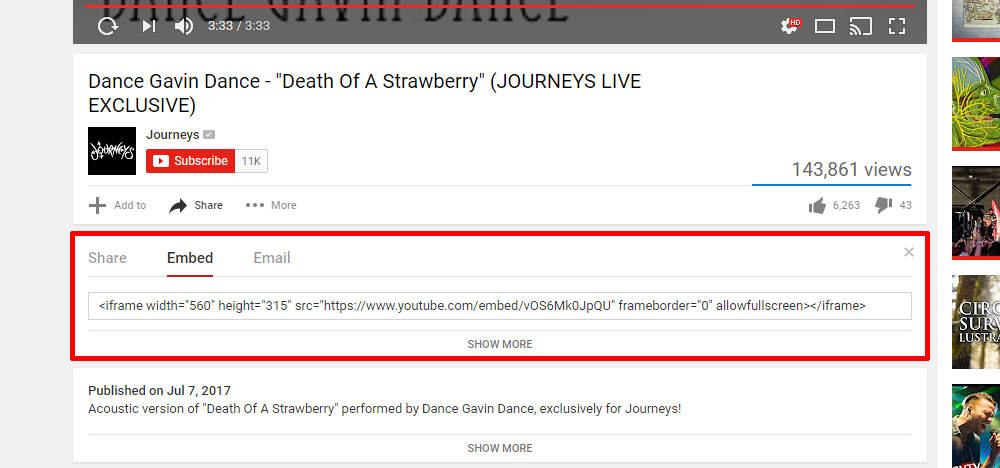
While YouTube added the width and height attributes to the inline frame tag, they are not required. You may even want to avoid them because the inline frame tag and video tag are some of the few tags to still have width and height attributes. The width and height attributes are deprecated on most elements (like the image and table tag). Before the fifth version of HTML5, they were more common, but since we are writing for HTML5 you should probably not use them. Instead, we can use CSS (which you can learn about after learning HTML).
Adding Audio Responsibly
What if we don’t want to add video to our HTML document? What if we just want to add audio to our page? We can do that using the audio tag. It follows the exact same rules as the video tag, except it is made for audio files. There are two commonly supported files for audio. These are WAV and MP3 files. You can use either or both (if one is not supported, using source tags). Here is a simple example using an MP3 file:
<audio src="cool-song.mp3" autoplay controls></audio>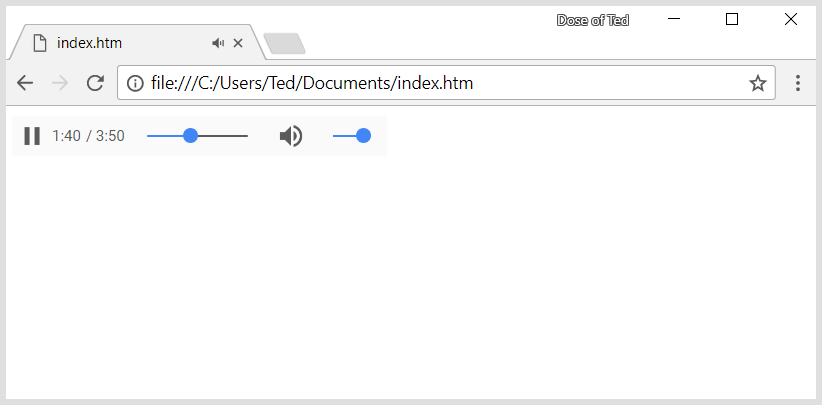
This example will load the song and automatically start playing (because of autoplay attribute) and we can control the song by using the controls (because of controls attribute). If we just want the song to play in the background without controls, we can remove the controls attribute, but I personally hate it when webpages play audio without my permission and without a pause button, so please don’t do that.
What if the audio file that we want to add to our page is not supported by the web browser? What if we have a file in FLAC format which is not supported in Microsoft Edge? If we we also have that file in MP3 format, we can specify a second source, just like we did for videos. Below is an example.
<audio>
	<source src="cool-song.flac">
	<source src="cool-song.mp3">
</audio>
Bonus: Forms and Inputs!
Note: You can skip over this section if you'd like as we can't really use forms until we learn PHP or JavaScript. However, what I will tell you in this section will not require either.
You've probably noticed that whenever you visit a website, some annoying ones will ask you for your email so you can sign up for their newsletter. This is a simple example of a form. A more complicated example is an order form. Whenever you buy something online, you input information like your name, address, and credit card information. That is done using forms. To create a form we use the form tag, like so:
<form></form>Inside of this form tag, we will put our form elements. One of the form elements we'll use the most is the input tag. The input tag allows us to accept input from whoever visits our page. The input tag looks like this inside of the form tag (not that it always has to be in a form tag):
<form>
	<input>
</form>
You'll notice that the input tag is another example of a void tag (nothing can be placed inside, no ending tag). Now that we have an input on the page, we need to specify what kind of data will be accepted. Will we be accepting an email address, a website address, or just some text (like someone's name)? We specify what type of data will be accepted by using the type attribute. Let's say we want to know the name of whoever is on our HTML page. The name is going to be a sequnce of characters so we are going to accept text, like so:
<input type="text">Now, the page knows that it can expect text to be typed into this field. The input tag actually supports a bunch of different input types (listed here) like date (type="date"), button (type="button"), and even color (type="color"). Go ahead and try some of these different input types out and see what they do.
Now that we know the type of input we are accepting, how do those visiting our HTML document know what to enter for this input field? While we could just type a paragraph tag or just type some text before typing our input tag, HTML actually gives us a label tag that we can use to label our inputs and what they're for (so others will understand). We can use it like this:
<label>Please enter name:</label>
<input type="text">
Now this is where things get a little bit complicated but stay with me. How will our page know which label goes with which input? We simply use the identifiers that we learned about earlier. We can give our input tag an ID of “name” for example. Once we have identified our input tag, we need to tell the web browser that our label belongs to the input tag with an ID of “name”. To do this, we use the for attribute. The for attribute will tell us what our label is for. The value for this attribute is the ID of the input tag we're looking for. An example may make this easier to explain:
<label for="name">Please enter name:</label>
<input type="text" id="name">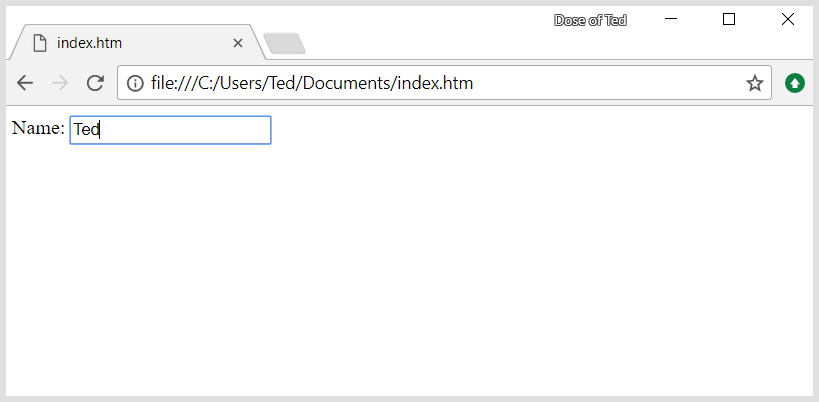
This may look confusing at first, but it will get easier later on. So, what was the point of telling the browser which label goes with which input? Why did I put you through this hassle? Now, when you click on the text inside of your label (when your page is opened in a web browser), your input field will receive focus and the blinking cursor will pop up. Go ahead and try it with the example below:
<!DOCTYPE html>
<html>
	<body>
		<form>
			<label for="name">Name:</label>
			<input type="text" id="name">
		</form>
	</body>
</html>
Now you can click on either the input field or the “Name:” text on the page to start typing.
There are a bunch of other tags that can go inside of the form tag that I will not go over in this tutorial. I will also not be going over how to submit this information to your server. I included this bonus section to give you an introduction to forms, however we cannot submit this information to our own server unless we know something about how to run a server. Specifically, we need to know how to use technologies like PHP or JavaScript in order to save any information that people input on our page. If I write a PHP tutorial in the future, I will go over more form tags and how to submit HTML forms.
What Was that For Again? (Comments in HTML)
We’ve learned a lot about HTML so far and should now have the ability (even if you may have to reread this a few times) to create our own HTML documents. When creating a full HTML page, we may want to make a note to ourselves to do something later or to remind us that we need to fix something. This is especially true when working in groups where we may make specific changes to the HTML document and need to leave a note for somebody else who is also working on that document. In this case, we need to use comments. Comments can be typed in your HTML document and will not be shown on the screen when your HTML document is opened in a web browser. Comments do not have starting and ending tags. Comments look like this:
<!-- A comment -->A comment has a start delimiter that consists of a less than sign followed an exclamation point and then two dashes. After this, we can type a comment. After the comment, we type the end delimiter which is two dashes followed by a greater than symbol. It is important to make sure that the starting and ending tag are typed correctly or you could either accidently have your comment appear on your HTML page if you mistype the starting tag or you could have the rest of your HTML disappear if you forget the ending tag.
Just remember that when you upload your HTML to a website, that comment will still be visible if someone taps the F12 button (which usually pulls up developer tools in web browsers), so keep it classy.
Uploading Your HTML Document
The whole point of HTML is to format a web page for viewing in a web browser. With that said, it would be sort of crazy to not tell you how to upload your website to the web. The unfortunate part about this is, the instructions will vary slightly depending on your web host. I will try to give you some general instructions though.

The easiest way to get your HTML on the web is to go through a web hosting company. A web hosting company will host your HTML on one of their servers, so that others can view your HTML document. Some popular ones include Namecheap, GoDaddy, and Bluehost (of which are also domain registrars, meaning they will give you a domain that people can type to visit your website). This will set you back a few dollars but you can usually get web hosting very cheap for the first year. Each web host has a different process for setting you up but they will usually ask you to choose a hosting plan and a domain name. Unless you expect to get a lot of people visiting your website, go with shared hosting (as it is the cheapest). Shared hosting just means that your website will sit on the same server as another website. After that (or before that depending on your web host), you will need to choose a domain name. Choose your dream domain then, when you find out someone else owns it or it cost big bucks, settle for something else.
Most web hosting companies will offer CPanel with their web hosting package. What’s CPanel? CPanel will give you an interface to manage your website and upload your HTML document to your website, all from your web browser. I would give you instructions on how to access CPanel but this varies depending on your web host. Your web hosting company should give you instructions on their website or through an email about how to access CPanel.
Once you have found CPanel, you will need to login (credentials are provided to you by the web hosting company, so check your email). Once you’re logged in, look for the search bar on the page and type in “file manager.” Click on File Manager below, and you will be presented with CPanel’s File Manager.
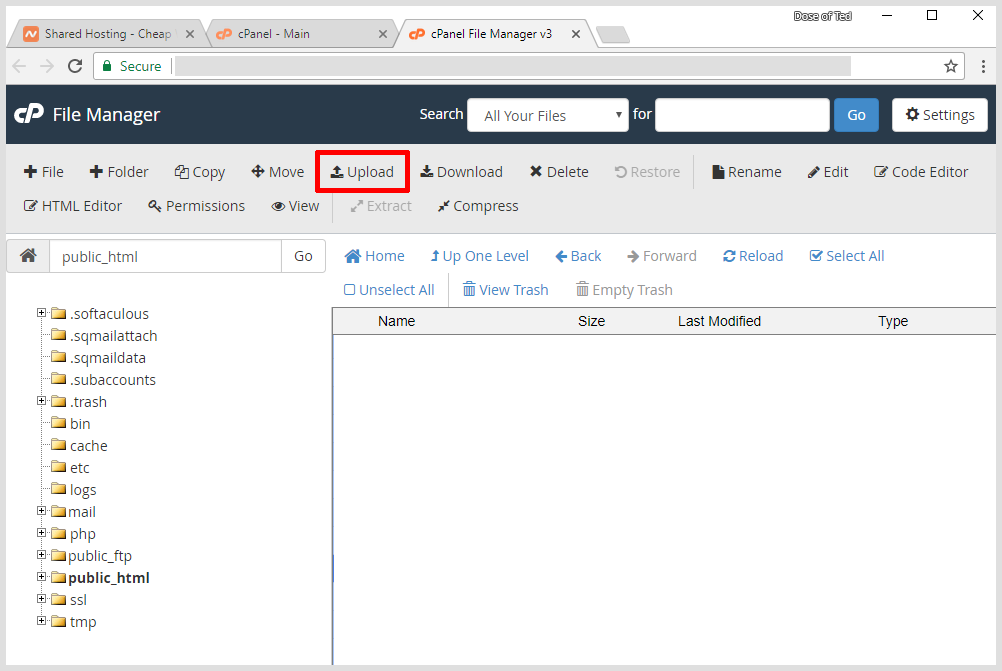
From here, you can navigate through your server. On the left hand side, you can see the folder structure of your server. Look for the “public_html” or “www” folder and then click it to enter that folder. Now, at the top of the page will be an Upload button. You can click that and then find your HTML document on your computer. Now you can visit your website and type the name of your HTML file afterwards, like this: “www.name-of-your-website.com/name-of-your-html-file.htm”.
If you don’t want to type the name of your file afterwards, you can usually rename your HTML document to something like "index.htm" to make it the homepage of your website. That way, when you visit “www.name-of-your-website.com”, you will be directed to your HTML file.
Where to Go From Here
As I said when we began, I did not plan on showing you everything there is to know about HTML. Instead, I wanted to show you the basics so that when you encounter new HTML, you will understand the syntax and be able to pick up new tags easily. There are some tags and attributes that I left out and some that I purposefully avoided. For example, I completely avoided talking about divider, span, and link tags (and style and class attributes) because they are more useful once you know CSS. I avoided talking about script tags and event attributes because they are specifically made for use with JavaScript. I completed avoided talking about form tags that allow you to receive input on your page because they are not useful unless you know either JavaScript or PHP.
I suggest that, from here, you first learn CSS (Cascading Styling Sheets). CSS will allow you to customize the look of your HTML and create very unique webpages. I plan on writing a tutorial on CSS after this tutorial, then a JavaScript tutorial after that. Until then, there are many resources online and books available to learn about it. I hope this tutorial has helped you learn HTML syntax. It may have been a little wordy but I hope it was in-depth enough that you can not just read HTML but write your own, with confidence.